
Showerheads can cause hidden plumbing leaks leading to damage and mold. Regularly inspect for drops or increased water bills. Leaks stem from worn seals, loose connections, or damaged threads. Replace old, damaged, or inefficient showerheads with modern models featuring water-saving aerators. Proper maintenance, including periodic inspection, cleaning, and replacement, prevents leaks, conserves water, and saves costs.
Is your showerhead dripping, or does it spray water unevenly? It might be time to check for plumbing leaks. This can not only waste water but also damage your walls and floors. In this article, we’ll guide you through identifying and addressing these leaks effectively. We’ll help you decide whether to replace or clean your showerhead, provide step-by-step replacement instructions, and offer tips to prevent future plumbing leaks in the showerhead to ensure a steady, efficient flow.
- Identify Plumbing Leaks in Showerheads
- Determine: Replace or Clean?
- Steps to Replace Showerhead
- Prevent Future Showerhead Leaks
Identify Plumbing Leaks in Showerheads
Showerheads can be a source of plumbing leaks, often going unnoticed until the problem escalates. Regularly inspect your showerhead for any signs of moisture or water damage outside the typical wear and tear. Look for small drops on the ceiling or wall above the shower, as well as mold growth around the base of the unit. Leaks may be caused by worn-out O-rings or gaskets, loose connections, or damaged threads.
To identify plumbing leaks efficiently, turn off the main water supply to your home and then observe if water continues to drip from the showerhead. If so, you likely have a leak. Additionally, check for sudden increases in your water bill without apparent reason, as this could also indicate hidden plumbing leaks. Promptly addressing these issues is crucial to prevent further damage and unnecessary water wastage.
Determine: Replace or Clean?

Showerheads can be a source of water waste and even plumbing leaks if not properly maintained. The decision to replace or clean your showerhead depends on several factors. First, inspect your showerhead for any signs of damage, such as corrosion, broken parts, or reduced water flow. If it’s merely clogged with mineral deposits or dirt, cleaning might be the best option. You can achieve this using vinegar or specialized cleaning solutions, which effectively remove buildup without replacing the entire unit.
However, if your showerhead is old, damaged, or no longer meets your water-saving goals, replacement might be more practical. Modern showerheads come with advanced features like aerators that mix air with water, reducing flow while maintaining pressure. Moreover, considering the environmental impact and potential long-term savings on your water bill, replacing an inefficient showerhead can be a wise investment.
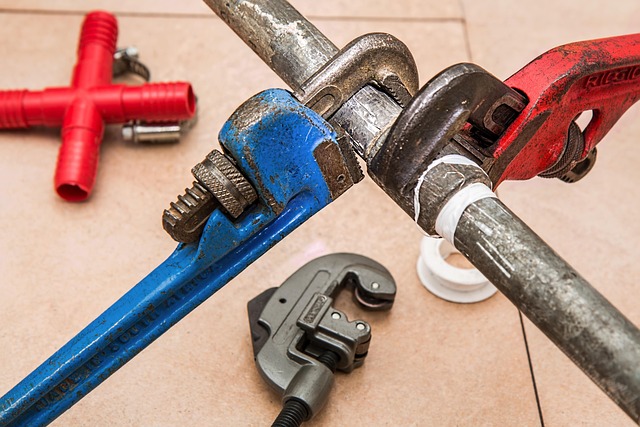
Steps to Replace Showerhead

Replacing a showerhead is a relatively straightforward task that can help prevent plumbing leaks and improve your shower experience. Start by gathering the necessary tools, including an adjustable wrench or pliers, and your new showerhead. Turn off the water supply to your shower by locating and closing the main shut-off valve beneath the sink or in your utility room. This step is crucial to avoid any unexpected water-related surprises during the replacement process.
Next, remove the old showerhead by unscrewing it counterclockwise using the appropriate tool. Be mindful of any water remaining in the pipes; you can use a bucket to catch it. Once the showerhead is removed, clean the shower arm and connection points to ensure no debris or calcium buildup. After cleaning, insert the new showerhead into the arm, ensuring it’s securely fastened in a clockwise direction. Double-check that all connections are tight to prevent leaks at the joints. Turn on the water supply and test your newly installed showerhead for any leaks before enjoying your improved showering experience.
Prevent Future Showerhead Leaks
To prevent future showerhead leaks, regular maintenance is key. Start by inspecting your showerhead for any signs of damage or corrosion every few months. Tighten any loose connections using a suitable wrench to ensure all parts are securely fastened. Over time, mineral deposits and buildup can accumulate inside the showerhead, reducing water flow and potentially causing leaks. Regular cleaning with vinegar or specialized cleaning solutions can help remove these residues, maintaining optimal performance.
Additionally, consider replacing your showerhead if it shows significant wear and tear or has been in use for several years. Newer models often come with improved sealing mechanisms and water-saving features that can prevent plumbing leaks. By incorporating these simple maintenance practices into your routine, you’ll extend the lifespan of your showerhead and avoid costly repairs related to plumbing leaks.